|
Blending Exposures in Landscapes
Photography, as we all know is all about light. Good light, bad light, soft light, harsh light,
light that comes in all shapes and sizes. The word photography comes from the Greek words "phos",
meaning "light", and "graphis", meaning "stylus" or "paintbrush". So, photography literally means
"painting with light". In landscape photography, our job is to use and control this light to make
pleasing images. In many cases, the scene we are trying to capture has more contrast or a larger
range of tones than our media can handle. We can use split neutral density filters, or with digital
you can blend together multiple images in Photoshop.
When to Blend
Blending is a good technique for sunrise and sunset shots, especially in photos with those strong
foreground elements. Another area in which it works well is with forest images where strong light
is streaming in blowing out the area it hits, while exposure remains correct for the rest of the scene.
Any such scene with a large dynamic range is a perfect candidate for blending.
|
|
Shooting to blend
To take photos with this technique in mind, a tripod is absolutely necessary. All it takes is the
tiniest change between the images, even caused by brushing against the tripod, and the images won't
line up. They'll be unblendable. One common method of shooting with blending in mind is to take
multiple images one f-stop apart, which is easily accomplished by simply changing the shutter speed.
In this way, the depth of field remains the same in all the photos. I would suggest that, if you
don't already, you use a cable release or a self timer. Stability is of most importance when shooting
for this purpose.
Layer Masks
 Before we begin working in Photoshop, I will explain the layer mask. The layer mask is a wonderful
tool added to all Photoshop versions beginning with the 6th. A layer mask is used to blend or fade
two layers together. When you add a layer mask (layer/add layer mask/reveal all), Photoshop adds a
small rectangle onto the layer icon in the layer palette. To use the mask once you've added it to
the layer, you click on the rectangle in the layer palette. After you click on it, anything you do
to the image does not affect the image but the mask. When you paint the mask black, the area painted
will show the layer below and anything white will show the layer the mask is applied to. All the grey
shades will be lower opacity according to the darkness or lightness of the grey. The darker the shade
of grey, the more of the lower layer will be revealed. Using this principle, you can begin working on
your images in Photoshop.
Before we begin working in Photoshop, I will explain the layer mask. The layer mask is a wonderful
tool added to all Photoshop versions beginning with the 6th. A layer mask is used to blend or fade
two layers together. When you add a layer mask (layer/add layer mask/reveal all), Photoshop adds a
small rectangle onto the layer icon in the layer palette. To use the mask once you've added it to
the layer, you click on the rectangle in the layer palette. After you click on it, anything you do
to the image does not affect the image but the mask. When you paint the mask black, the area painted
will show the layer below and anything white will show the layer the mask is applied to. All the grey
shades will be lower opacity according to the darkness or lightness of the grey. The darker the shade
of grey, the more of the lower layer will be revealed. Using this principle, you can begin working on
your images in Photoshop.
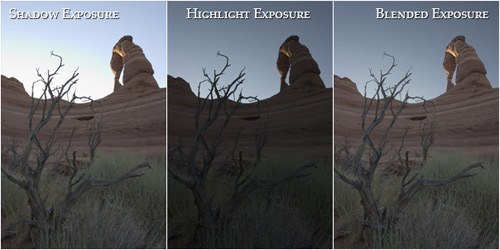
Blending in Photoshop
Open your images in Photoshop (versions 7, CS, or CS2). Two exposures are all that is needed, one for
the sky and one for the foreground. Be sure not to choose images that are too drastically different.
That will look very unnatural. For some images, three or more images may be necessary to ensure an
unnoticeable blend. Use the "Move Tool" to drag one image over on top of the other. The next step is
to click your top layer and add a layer mask (layer/add layer mask/reveal all) to the top layer.
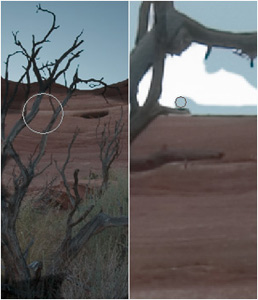 Using a
large brush of up to 500px
depending on your original image size and about 70% hardness, paint black the area you want to mask
out. If you change your mind or make an error, use white to paint the area back in. For Example: a
sunset shot with a large wheat field in the foreground. If the top layer is the exposure for the
grasses and the lower layer the exposure for the sky, add the mask to the top layer, painting black
the whole sky. With the large brush, paint in as close to the horizon as possible. Then with a much
smaller brush, refine the more detailed areas. Each image is different. With one, you might be able
to get away with a simple sweep of a large soft brush across the horizon, with another you might have
to use a brush that's anywhere from 10 to 20 pixels at 50% hardness to get into every little crevice.
One major key to successful blending is using lower opacities. Whether you're lightening or darkening
a particular portion of the image or just running a small soft brush along your horizon with a 25
percent opacity, lower opacities clean up the blend very nicely. Using a
large brush of up to 500px
depending on your original image size and about 70% hardness, paint black the area you want to mask
out. If you change your mind or make an error, use white to paint the area back in. For Example: a
sunset shot with a large wheat field in the foreground. If the top layer is the exposure for the
grasses and the lower layer the exposure for the sky, add the mask to the top layer, painting black
the whole sky. With the large brush, paint in as close to the horizon as possible. Then with a much
smaller brush, refine the more detailed areas. Each image is different. With one, you might be able
to get away with a simple sweep of a large soft brush across the horizon, with another you might have
to use a brush that's anywhere from 10 to 20 pixels at 50% hardness to get into every little crevice.
One major key to successful blending is using lower opacities. Whether you're lightening or darkening
a particular portion of the image or just running a small soft brush along your horizon with a 25
percent opacity, lower opacities clean up the blend very nicely.
Once you are pleased with the look of your image, you can:
Add contrast and sharpen each layer separately. Merge the two layers together (layer/merge visible) and
add further adjustments after that. Adjusting contrast before you merge the layers may affect your blend.
Once the layers are merged, post processing is just 'business as usual'.
At this point, it is practice makes perfect. Just take your time, don't be afraid to drop down to a
smaller brush, and most importantly, have fun!
|
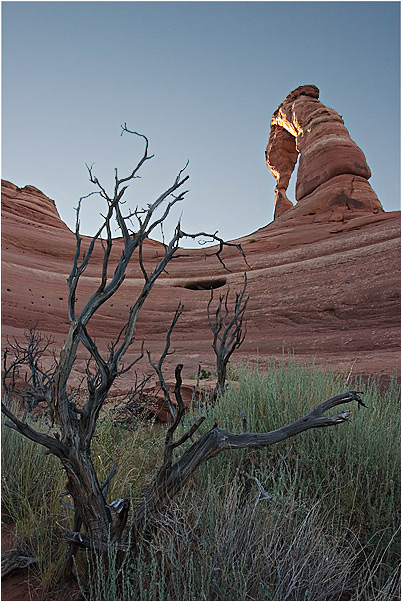
Finished Image
|
|


